
Setting up DNS records for your domain might seem complex. But it’s easier than you think.
DNS records are crucial for your website. They direct traffic and help users find your site. In this guide, we’ll break down the steps to set up DNS records. Understanding DNS (Domain Name System) is key for managing your domain.
Whether you’re launching a new site or updating an existing one, the right DNS settings ensure smooth operation. By the end, you’ll know how to configure DNS records correctly. This knowledge helps your site run efficiently and keeps visitors happy. Let’s dive into the world of DNS and make your domain work for you.
Introduction To Dns Records
Setting up DNS records for your domain is crucial. DNS records ensure your domain’s proper functionality. They connect domain names to IP addresses. This is essential for your website to be accessible online. Without DNS records, your domain cannot be found by users.
What Are Dns Records?
DNS records are instructions stored in your domain’s DNS. They tell the DNS servers how to handle your domain. Each record has a specific purpose. Common types include A records, CNAME records, MX records, and TXT records.
| Record Type | Description |
|---|---|
| A Record | Points a domain to an IP address. |
| CNAME Record | Aliases one domain to another. |
| MX Record | Specifies mail servers for receiving emails. |
| TXT Record | Provides additional text information. |
Importance Of Dns Records
DNS records are vital for the visibility of your website. They ensure users can find your site. They also manage email delivery, web traffic, and other services.
Without correct DNS records, your domain may face issues. These issues include email problems, website downtime, and security risks. Proper DNS configuration helps maintain a smooth online presence.
- Website Access: Users can visit your site using a domain name.
- Email Delivery: Email servers know where to send your emails.
- Security: Prevents unauthorized access and improves safety.
Types Of Dns Records
Understanding DNS records is crucial for setting up your domain. These records tell the internet where to find your website. Different types of DNS records serve different purposes. Knowing their functions can help you manage your domain effectively.
A Record
An A Record maps your domain name to an IP address. It tells browsers where to find your website. This is the most common type of DNS record. For example, it connects example.com to 192.0.2.1. If you change your server, you update the A Record. This keeps your site accessible.
Cname Record
A CNAME Record stands for Canonical Name. It links one domain name to another. This is useful for subdomains. For example, you can link blog.example.com to example.com. Users can access your blog through the subdomain. CNAME records simplify domain management. They reduce the need to update multiple records.
Mx Record
MX Records, or Mail Exchange Records, direct email to your mail server. They specify the mail server for your domain. For example, mail sent to user@example.com goes to your specified mail server. MX Records ensure your emails reach the right destination. Setting priority levels can direct traffic to backup servers if needed.
Txt Record
TXT Records allow you to add text information to your domain. They are versatile and serve many purposes. For example, you can verify domain ownership with Google. You can also add SPF records to reduce spam. TXT Records are essential for security and verification.
Gathering Necessary Information
Before setting up DNS records for your domain, gather some essential details. These details ensure the process goes smoothly and accurately. You’ll need information from your domain registrar and web hosting provider. Let’s break it down.
Domain Registrar Details
Your domain registrar is where you purchased your domain name. You will need to log into your account to access specific information. Here is what to look for:
- Domain Name: Ensure you have the correct spelling and extension.
- Account Login: Username and password for the registrar’s website.
- Nameservers: These are critical for directing traffic to your site.
Web Hosting Information
Your web hosting provider holds the files for your website. You need to gather the following details:
| Information | Description |
|---|---|
| IP Address | This is where your domain points to your hosting server. |
| Control Panel Access | Login details for managing your hosting account. |
| FTP Credentials | Username and password for uploading files. |
Once you have gathered all this information, you are ready to set up your DNS records. This preparation saves time and prevents mistakes.
Credit: learn.microsoft.com
Accessing Your Dns Settings
Setting up DNS records is crucial for managing your domain. First, you need to access your DNS settings. This guide will help you through the steps. You will learn how to login to your domain registrar and navigate to the DNS management section.
Login To Domain Registrar
To start, you need to login to your domain registrar. This is the company where you registered your domain. Common registrars include GoDaddy, Namecheap, and Google Domains. Follow these steps:
- Open your web browser.
- Go to your domain registrar’s website.
- Click on the login button, usually found at the top right corner.
- Enter your username and password.
- Click the submit button to login.
Once logged in, you can access your account dashboard. This is the main area where you manage your domain settings.
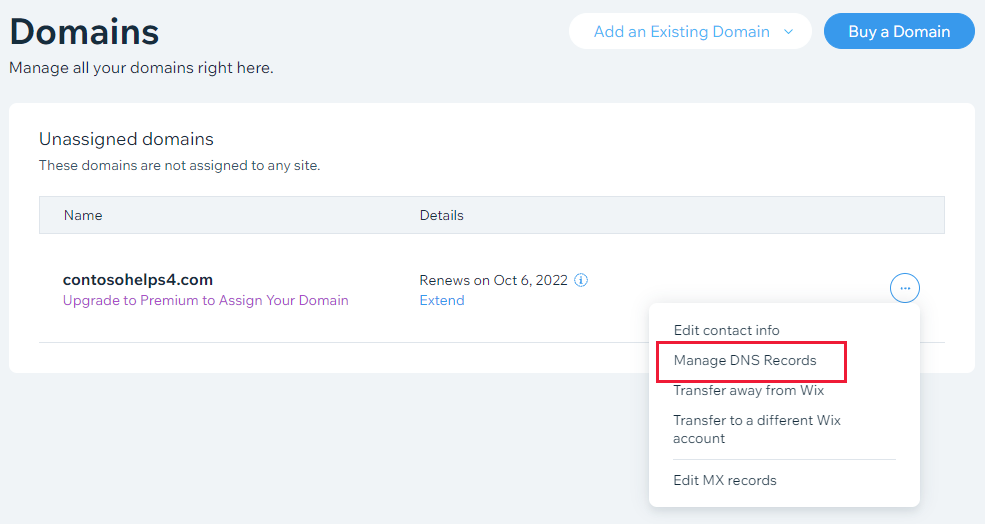
Navigate To Dns Management
After logging in, the next step is to navigate to the DNS management section. This is where you can view and edit your DNS records. Follow these steps:
- In your account dashboard, look for the domains section.
- Click on the domain name you want to manage.
- Find the DNS or DNS settings option.
- Click on it to access your DNS records.
In the DNS management section, you will see a list of your current DNS records. These include A records, CNAME records, MX records, and others. You can add, edit, or delete records as needed.
Make sure to save any changes you make. This ensures your DNS settings are updated correctly.
Adding A Record
Setting up an A Record for your domain is essential. This record points your domain to a specific IP address. It allows users to access your website. Follow the steps below to add an A Record.
Identify Ip Address
First, you need the IP address of your server. This is where your website is hosted. You can get this from your hosting provider. Make sure the IP address is correct. An incorrect IP address will lead to errors.
Create A Record
Log in to your domain registrar’s website. Go to the DNS management section. Look for an option to add a new A Record. Enter your domain name in the appropriate field. Then, input the IP address you identified earlier. Save the changes. It may take some time to propagate.
Adding Cname Record
Adding a CNAME record to your domain is essential for redirecting one domain to another. This helps in pointing subdomains to your main domain, making management easier. Let’s dive into the steps to add a CNAME record.
Determine Alias
First, decide the subdomain you want to redirect. This is the alias. For example, use “blog” to point to your main site. This makes it easy for visitors to find your blog.
Create Cname Record
Log into your domain registrar’s dashboard. Find the DNS settings section. Look for the option to add a new record. Choose CNAME from the dropdown menu.
Enter the alias you determined. For our example, enter “blog”. Next, enter the target domain name. This is the main domain you want to point to. Click save or add to complete the process.
That’s it! You have successfully added a CNAME record to your domain. Your subdomain now redirects to the main domain.
Adding Mx Record
Adding MX records to your DNS settings is essential for email delivery. MX stands for Mail Exchange, and these records direct email to your mail server. This process is straightforward, even for beginners. Follow the steps below to ensure your email gets delivered correctly.
Collect Mail Server Information
First, gather your mail server information. This includes the mail server name and priority number. Your email provider will supply these details. Keep this information handy for the next step.
Create Mx Record
Next, log in to your DNS management tool. This could be your domain registrar or a third-party service. Find the option to add a new DNS record. Choose MX from the record type options.
Enter the mail server name you collected earlier. Also, input the priority number. Lower numbers mean higher priority. Save your changes. Your MX record is now set up, directing emails to your mail server.
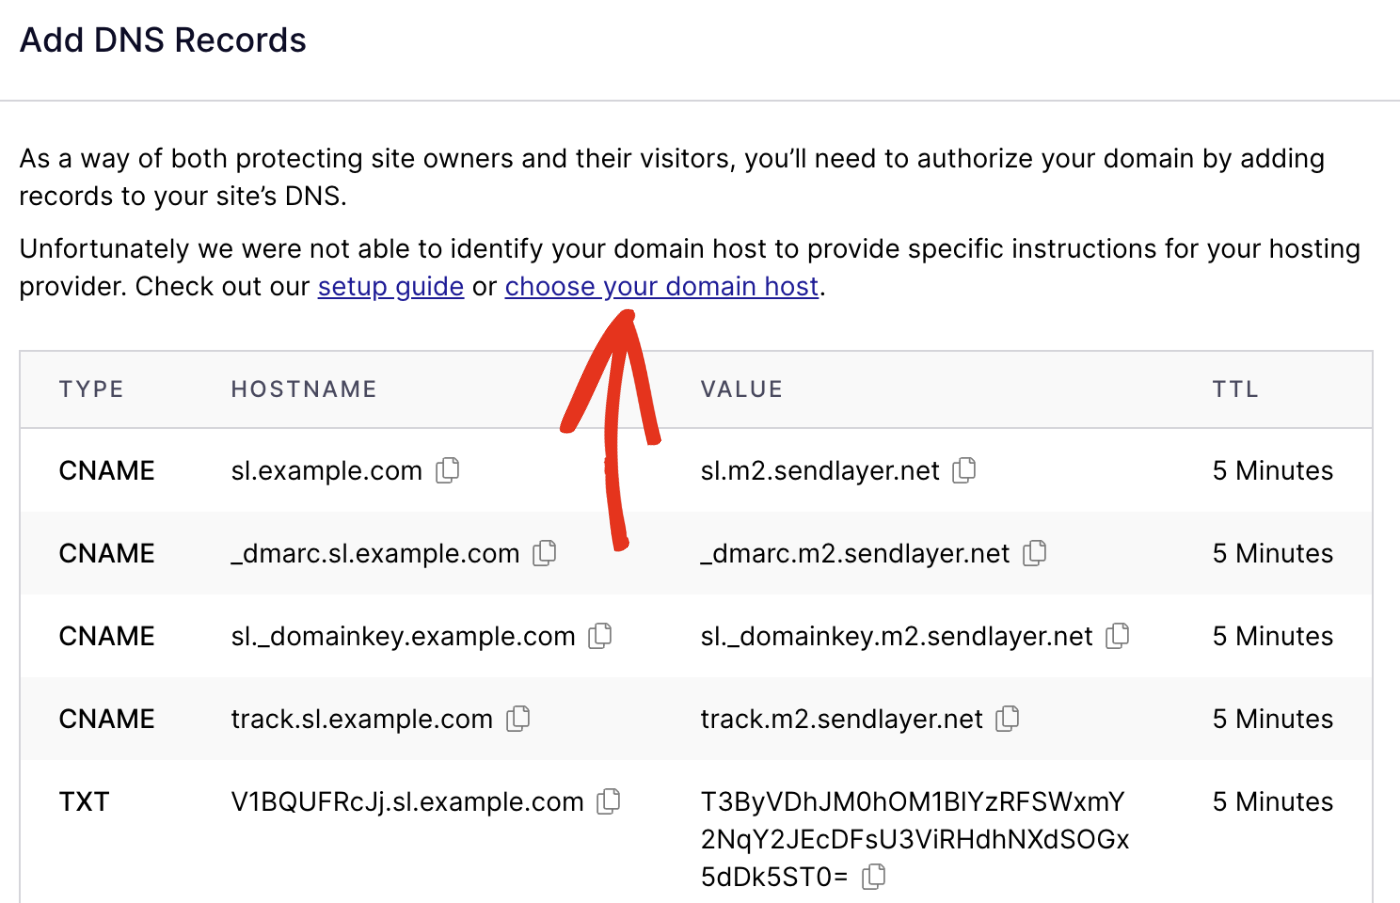
Credit: sendlayer.com
Verifying Dns Records
Setting up DNS records for your domain is crucial. Once you’ve added your DNS records, verifying them ensures everything works correctly. This step helps confirm your DNS changes are effective and your domain points to the right server.
Propagation Time
Propagation time is the period it takes for DNS changes to update across the internet. This can take anywhere from a few minutes to 48 hours. It varies depending on your DNS provider and the TTL (Time to Live) settings. Patience is key during this period. Check periodically to see if changes have taken effect.
Using Online Tools
Online tools help verify your DNS records. Websites like DNSChecker.org or MXToolbox.com offer free DNS lookup services. Enter your domain name and select the type of DNS record you want to check. These tools show if your DNS records are correctly set up. They also highlight any issues that might need fixing. Using these tools ensures your domain functions as expected.
Troubleshooting Common Issues
Setting up DNS records for your domain can be tricky. Common issues include incorrect record types or misconfigured IP addresses. Follow step-by-step guides to troubleshoot effectively.
Setting up DNS records for your domain can be tricky. Sometimes, issues arise that can be frustrating. Here are some common problems and solutions.Incorrect Ip Address
One common issue is having the wrong IP address. This often happens because of typos. Double-check the IP address you entered. Ensure it matches the server’s IP. If not, correct it and save the changes. Another cause of incorrect IP addresses is outdated information. Ensure your records reflect the current server address. Contact your hosting provider if unsure. They can provide the correct IP address.Propagation Delays
DNS changes do not happen instantly. This delay is called propagation. Propagation can take up to 48 hours. During this time, some users might see the old site. To check the status, use online propagation checkers. These tools show if changes have spread globally. If the delay is longer than 48 hours, there might be other issues. Ensure that TTL (Time To Live) settings are correct. A high TTL value can cause longer delays. Lower the TTL value before making changes. This speeds up the propagation process. “`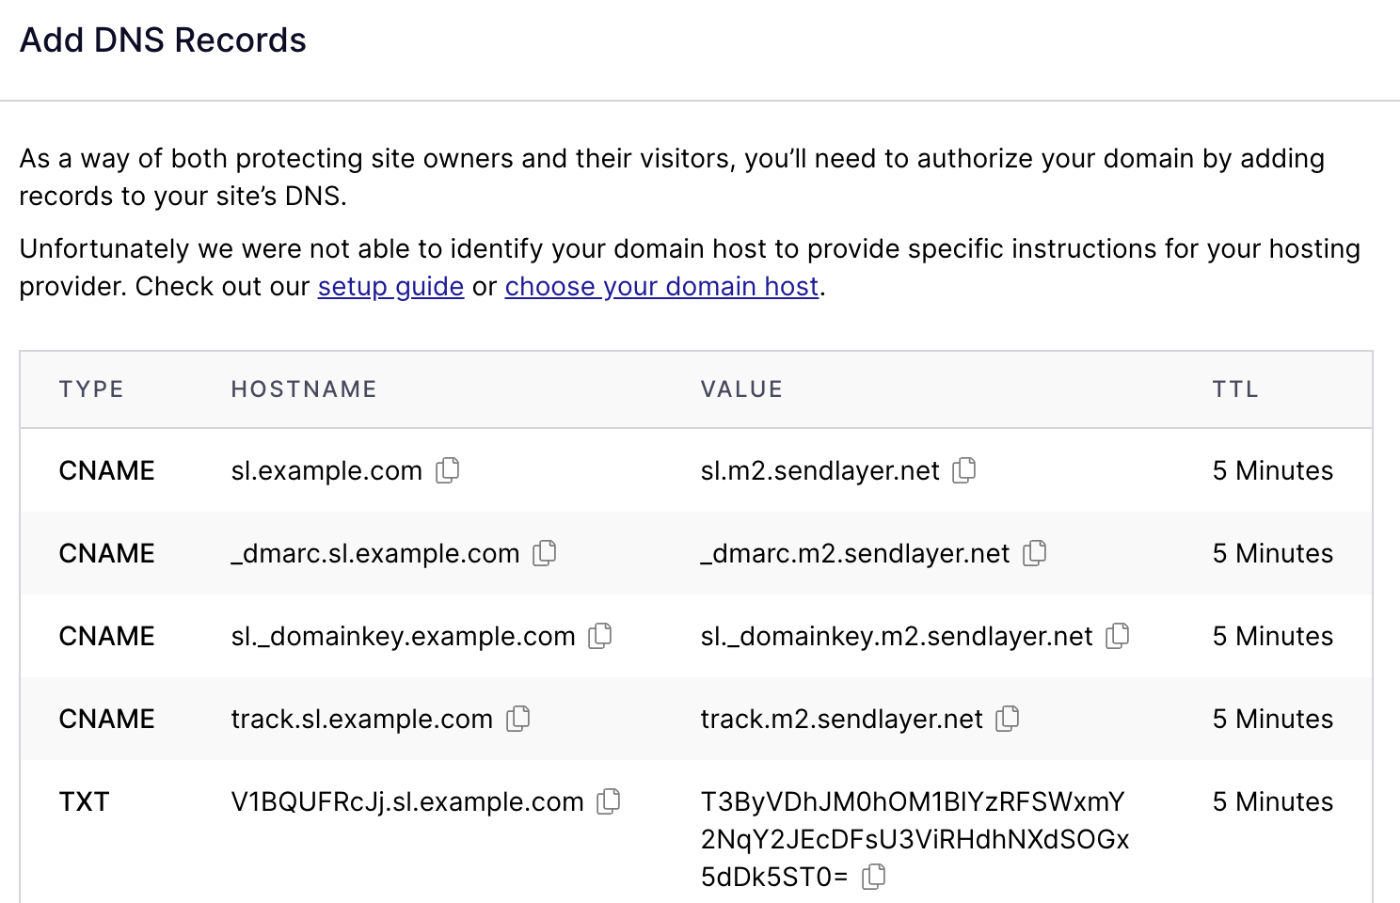
Credit: sendlayer.com
Frequently Asked Questions
What Are Dns Records?
DNS records are instructions that live in authoritative DNS servers. They provide information about a domain, such as IP addresses.
How Do I Add Dns Records?
To add DNS records, access your domain registrar’s DNS management tool. Then, enter the required details and save.
What Types Of Dns Records Exist?
Common DNS record types include A, AAAA, CNAME, MX, and TXT. Each serves a specific purpose.
Why Are Dns Records Important?
DNS records are crucial for directing traffic to your website. They ensure your domain resolves to the correct IP address.
Conclusion
Setting up DNS records doesn’t have to be complicated. Follow the steps carefully. Ensure you choose the right DNS records for your needs. Test your settings to confirm everything works. Keep your domain secure with updated DNS records. Regularly monitor and maintain your DNS settings.
This will help keep your website running smoothly. Proper DNS setup ensures better site performance and reliability. Always stay updated with best practices. Happy managing your domain!